Social media has become much more than a way to connect online with friends and family. Actively engaging in social media is one of the primary ways brands find new consumers, connect with their audience in meaningful ways, and drive traffic back to their website.
In fact, 73 percent of marketers report that social media marketing has been either “somewhat effective” or “very effective” for their business, according to a recent study by Buffer.
One of the main reasons social media is such a productive marketing platform is because of how many consumers actively participate on Facebook, Twitter, Instagram, and other social platforms, and how much time people spend on social media.
One study even reports that the average social media users spend 3 hours a day on social networks and messaging, and over 90% of Millennials, 77% of Generation X, and 48% of Baby Boomers actively participate in social media.
The question isn’t whether or not you should advertise on social media to drive traffic back to your website (you should). The question is how do new website owners boost a post on social media and how do you ensure you reach the right audience.
This article will provide instructions on how to boost posts on Facebook, Twitter, Instagram, and LinkedIn so you can target your ideal customer.
How to Boost a Post on Facebook
Facebook is an excellent place for new website owners to advertise, considering the platform has over 2 billion users.
Here are the steps for boosting a post on Facebook.
1. If you haven’t created a Facebook page for your business, that’s your first step. If you have already created a Facebook page for your business, navigate to your page, and create your first post.
2. Select the “Boost Post” option on your new Facebook post. If you are boosting an old Facebook post, click on “Boost Post” on the bottom right section of your post.
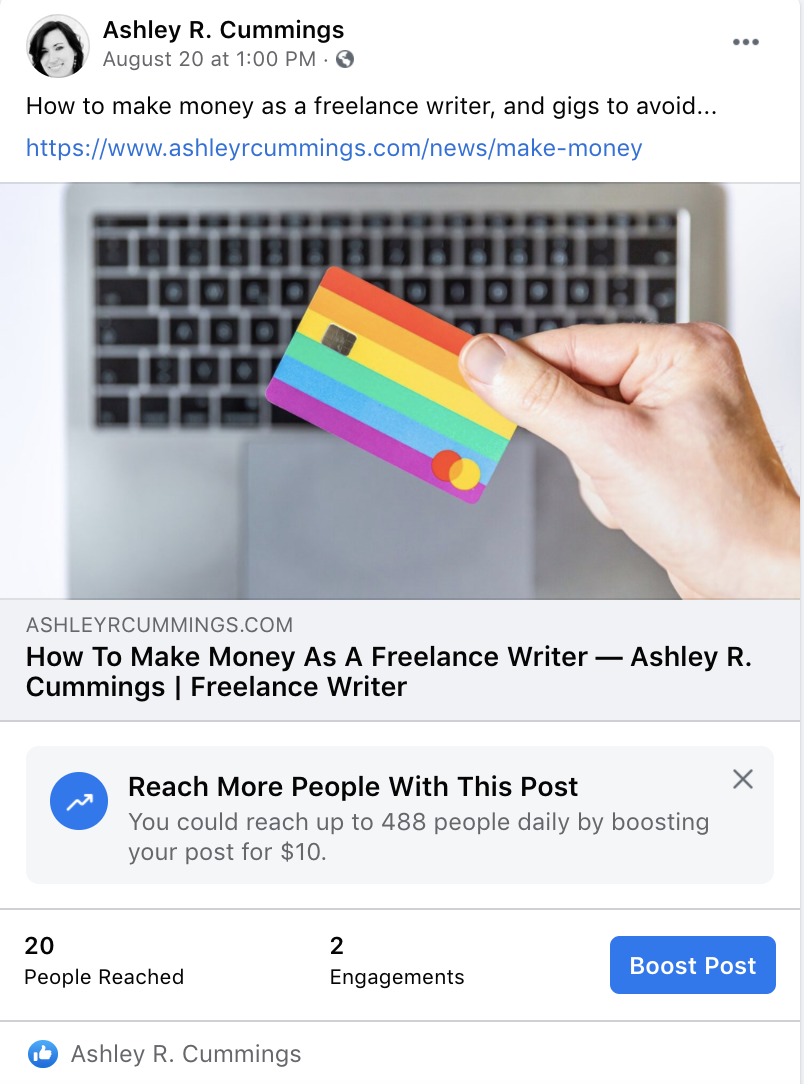
3. Once you select “Post” for a new post or “Boost Post” for an old post, Facebook will redirect you to a page where you can choose your audience.
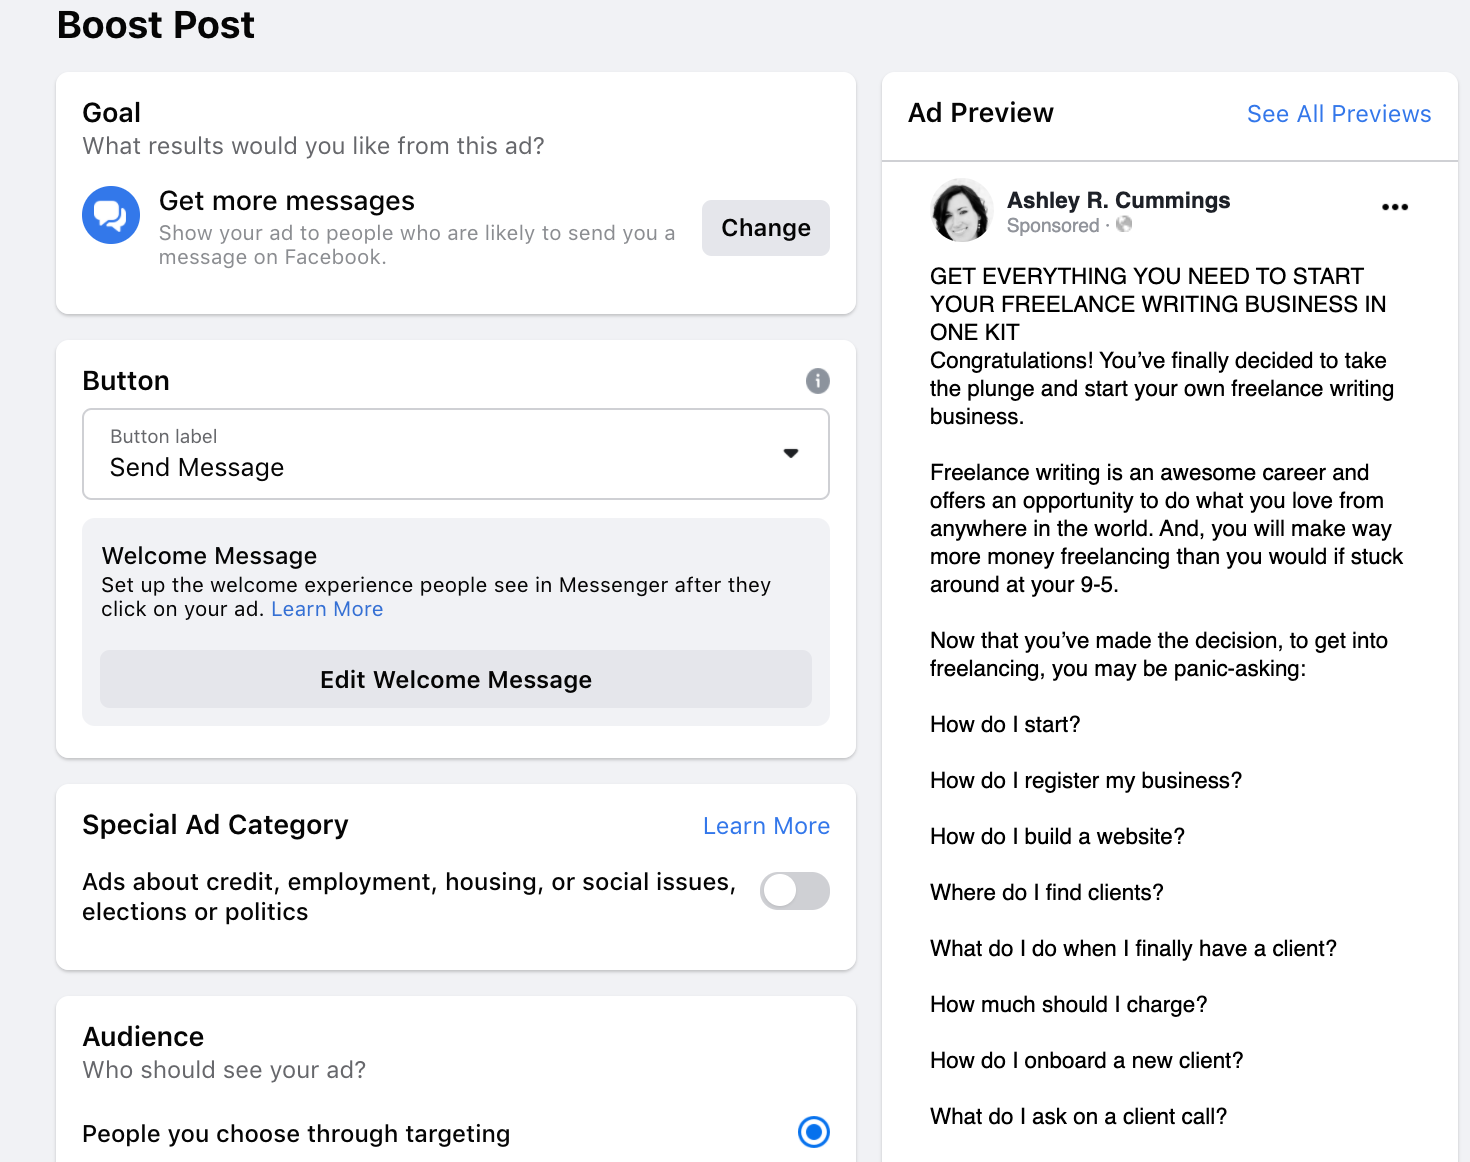
4. From this page, you can choose a goal, change your button label, select your audience, preview your ad, select the duration of your ad, and select a budget.
5. Once you have customized your audience, click on “Boost Post Now” at the bottom of the page. Facebook will submit your ad, review it, and approve it, provided your post doesn’t violate any of Facebook’s rules.
6. Once you submit your post, Facebook will show you a screen where you can select “Go to Ad Center.” The Ad Center is where you can see all your advertising metrics for your Facebook and Instagram accounts.
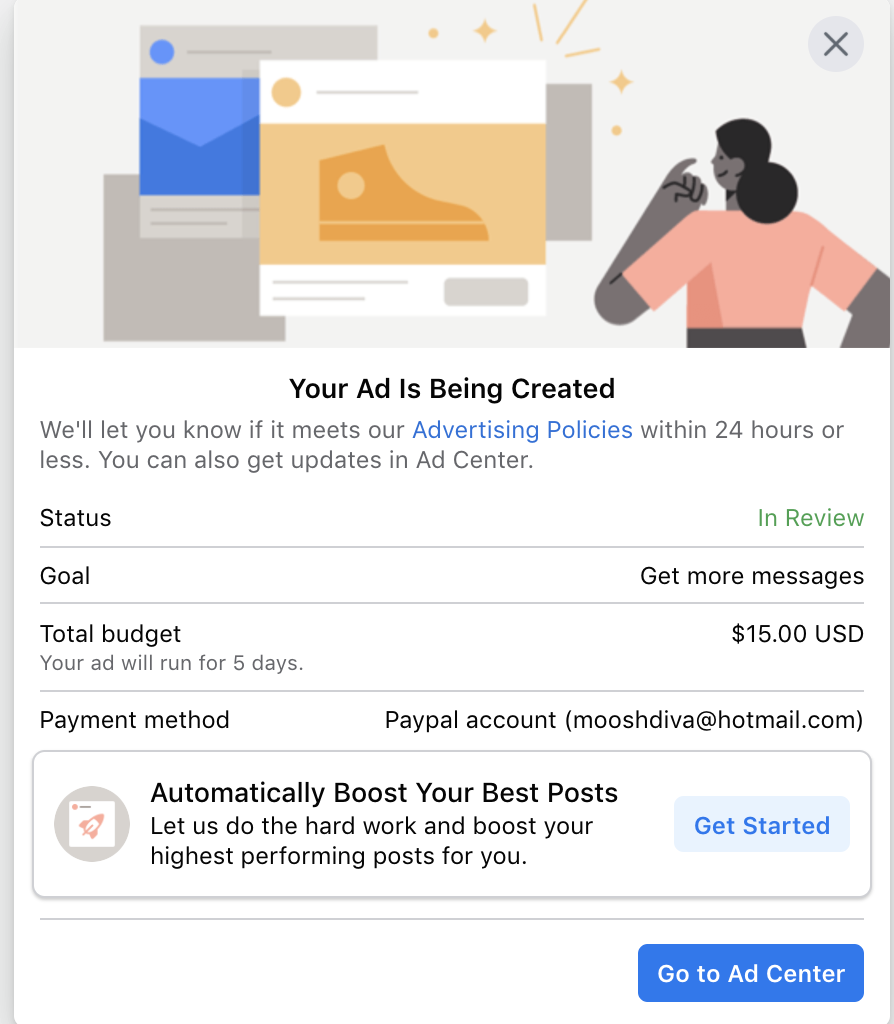
And that’s it! Once you complete this process, Facebook will deliver your ad to Facebook users that match your defined audience. You can also track the progress of your ad at any time by reviewing your Facebook analytics.
How to Boost a Post in Instagram
Facebook owns Instagram, so the process for posting a post on Instagram is exactly the same as boosting a post on Facebook.
The only difference is when you are customizing your audience, you need to pay special attention to the “Placements” section.
If you click on “Placements,” make sure to check the box that says “Instagram.”
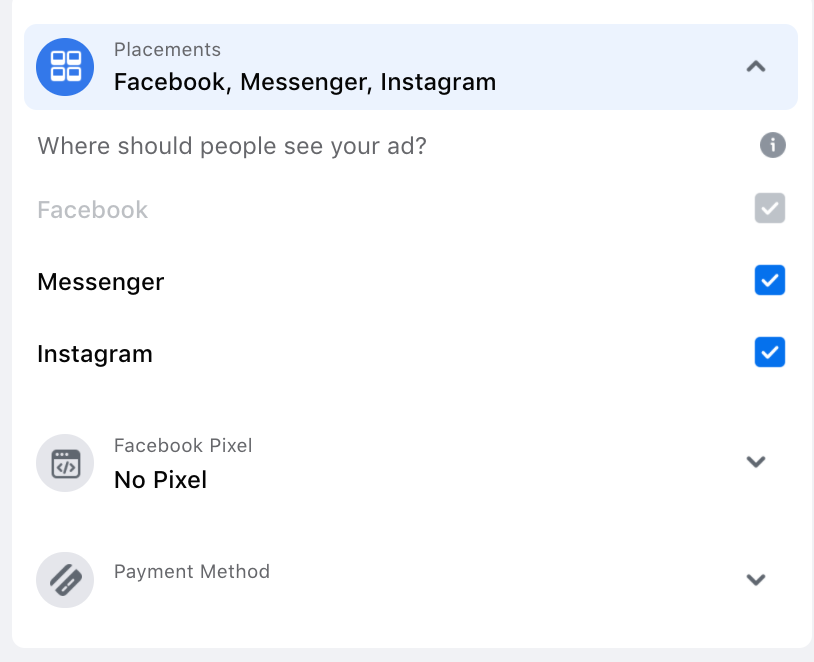
If you do this, you can rest assured your ad will also appear on Instagram.
Since some businesses will create an Instagram business account, but not a Facebook Page, there is an alternative way to promote a post on Instagram.
Another way to boost a post on Instagram is within your Instagram business account itself. Here’s how.
1. Log in to your Instagram account and navigate to the post you want to promote.
2. Click on “Promote” at the bottom of the post.
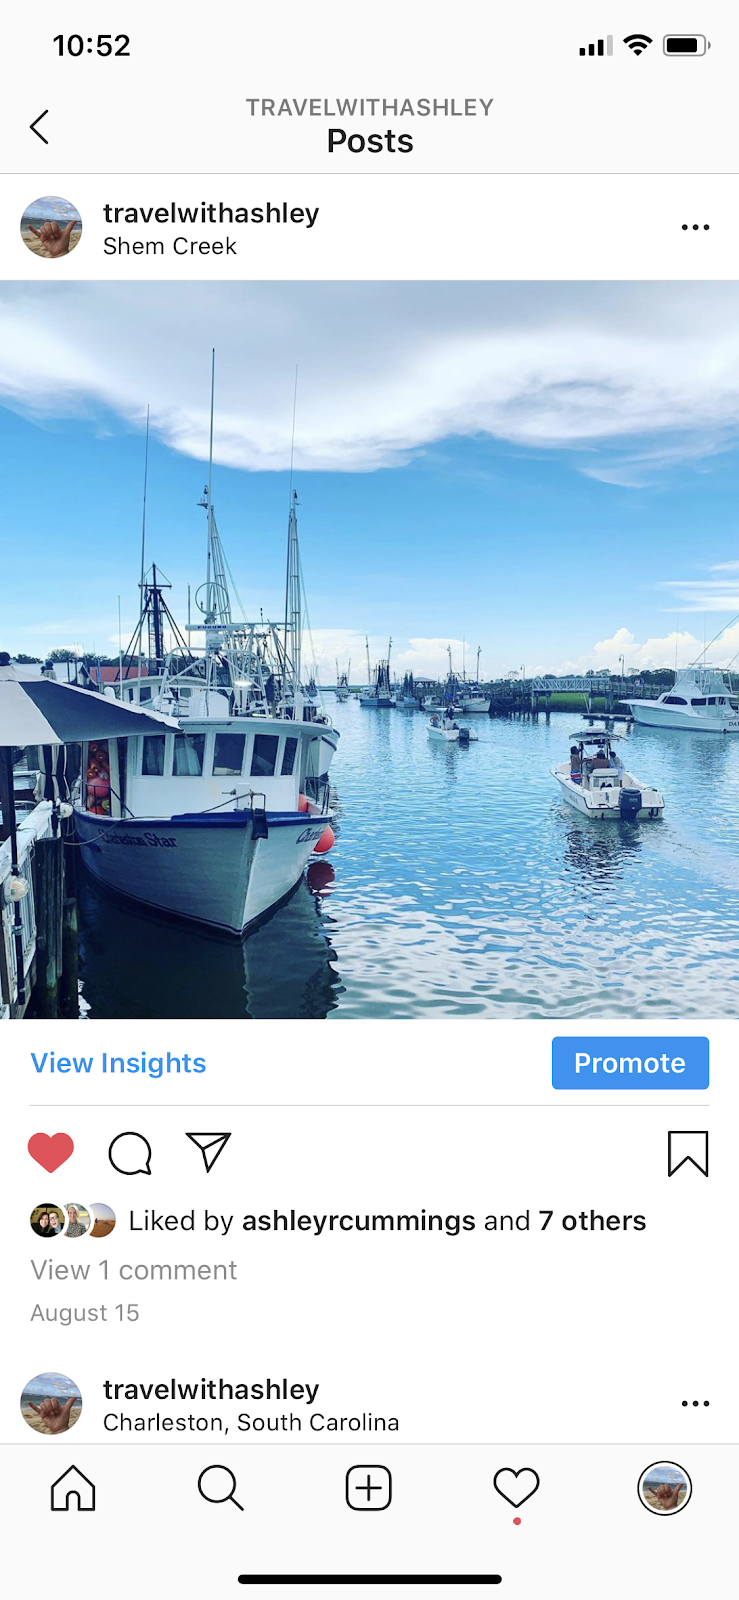
3. Instagram will redirect you to a page that says “Create Promotion.” Click this button.
4. Select where you want to send your audience by toggling one of the following options: your profile, your website, or your direct messages.
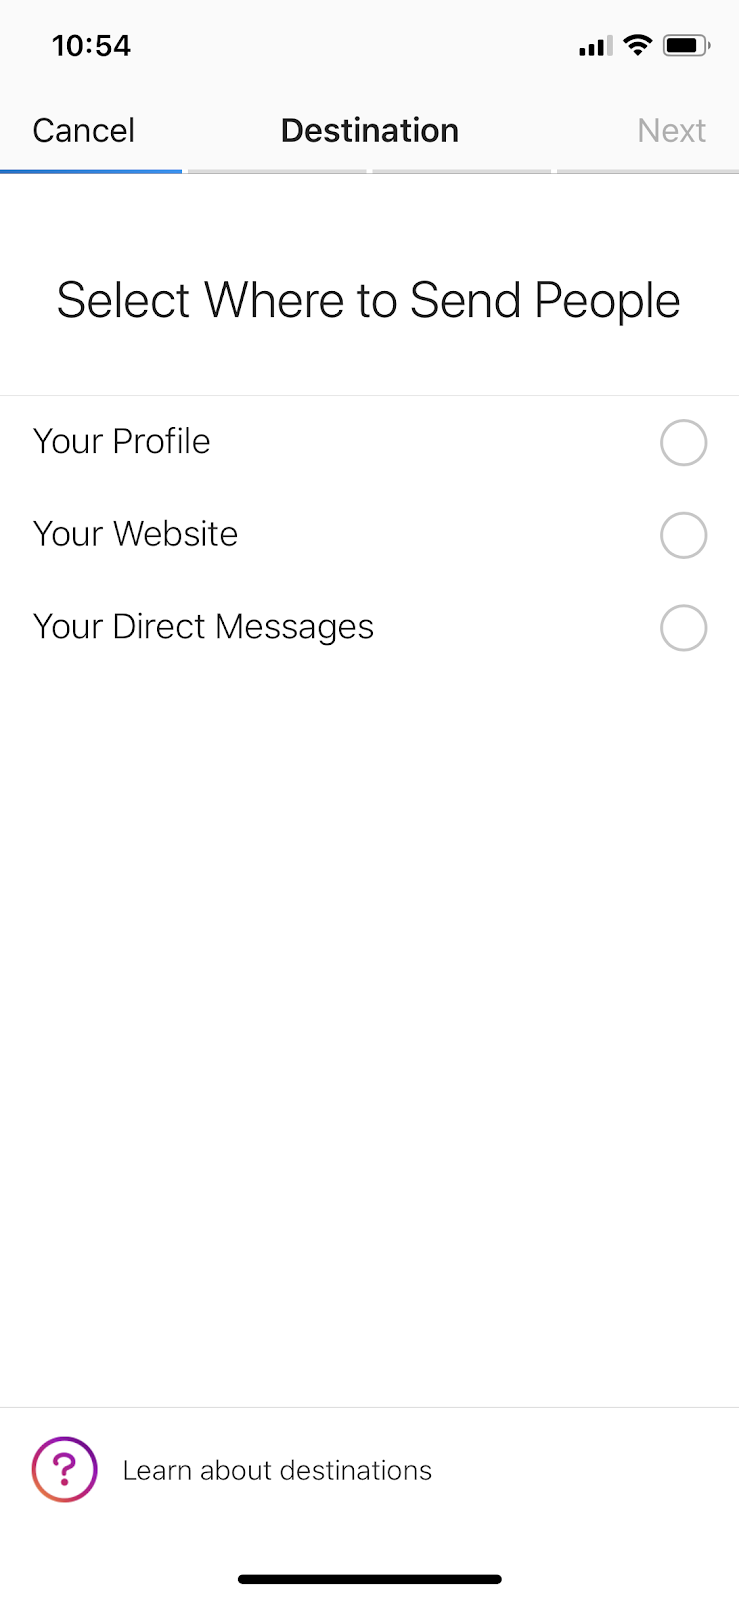
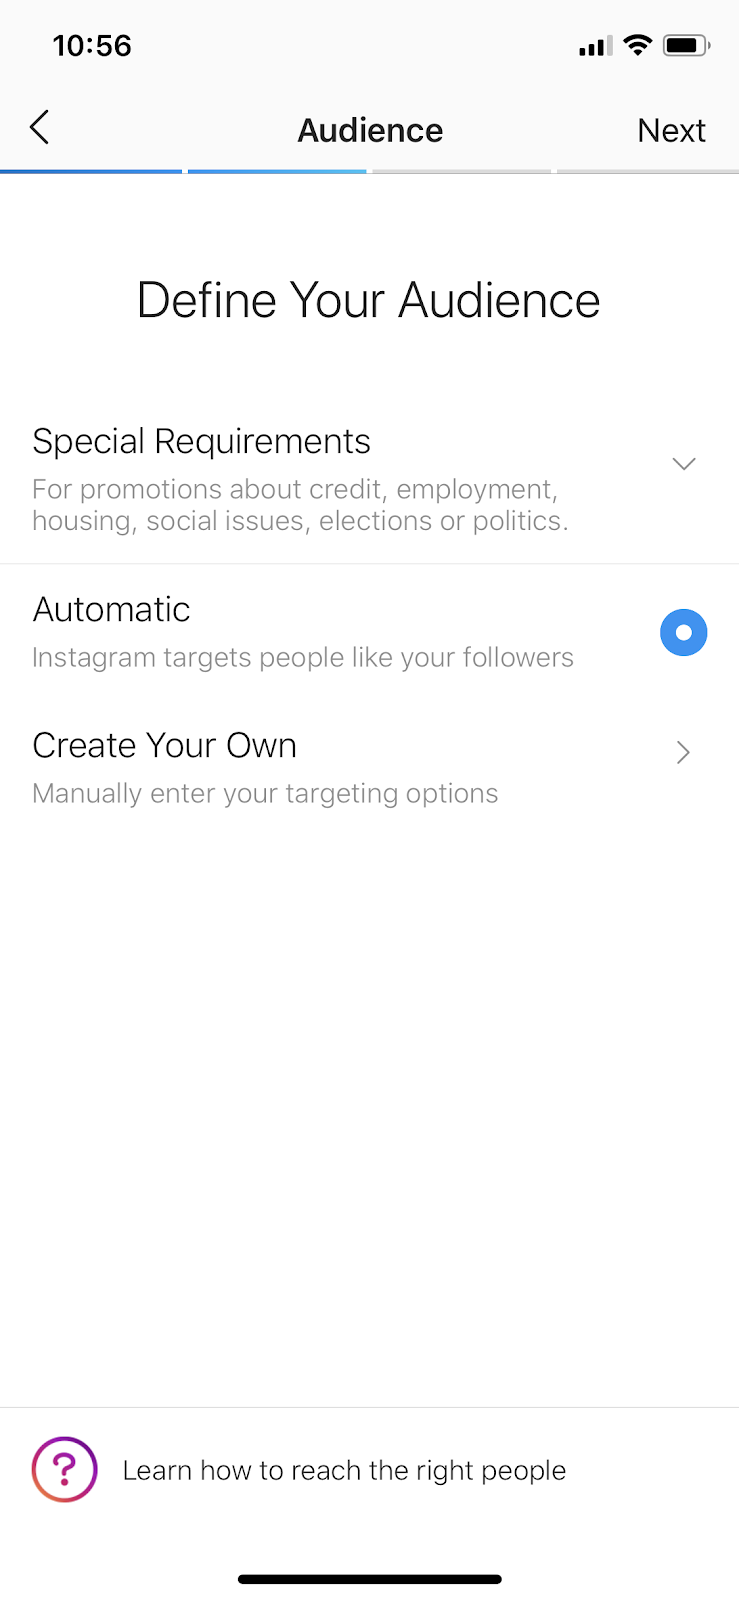
5. Once you toggle an option, Instagram will send you to a page where you can define your audience. You can choose your own audience or have Instagram do it for you. If you already know who you want to target, consider creating your own audience. If you are not sure who should see your ad, Instagram has an algorithm that will target accounts that are similar to people who already follow you.
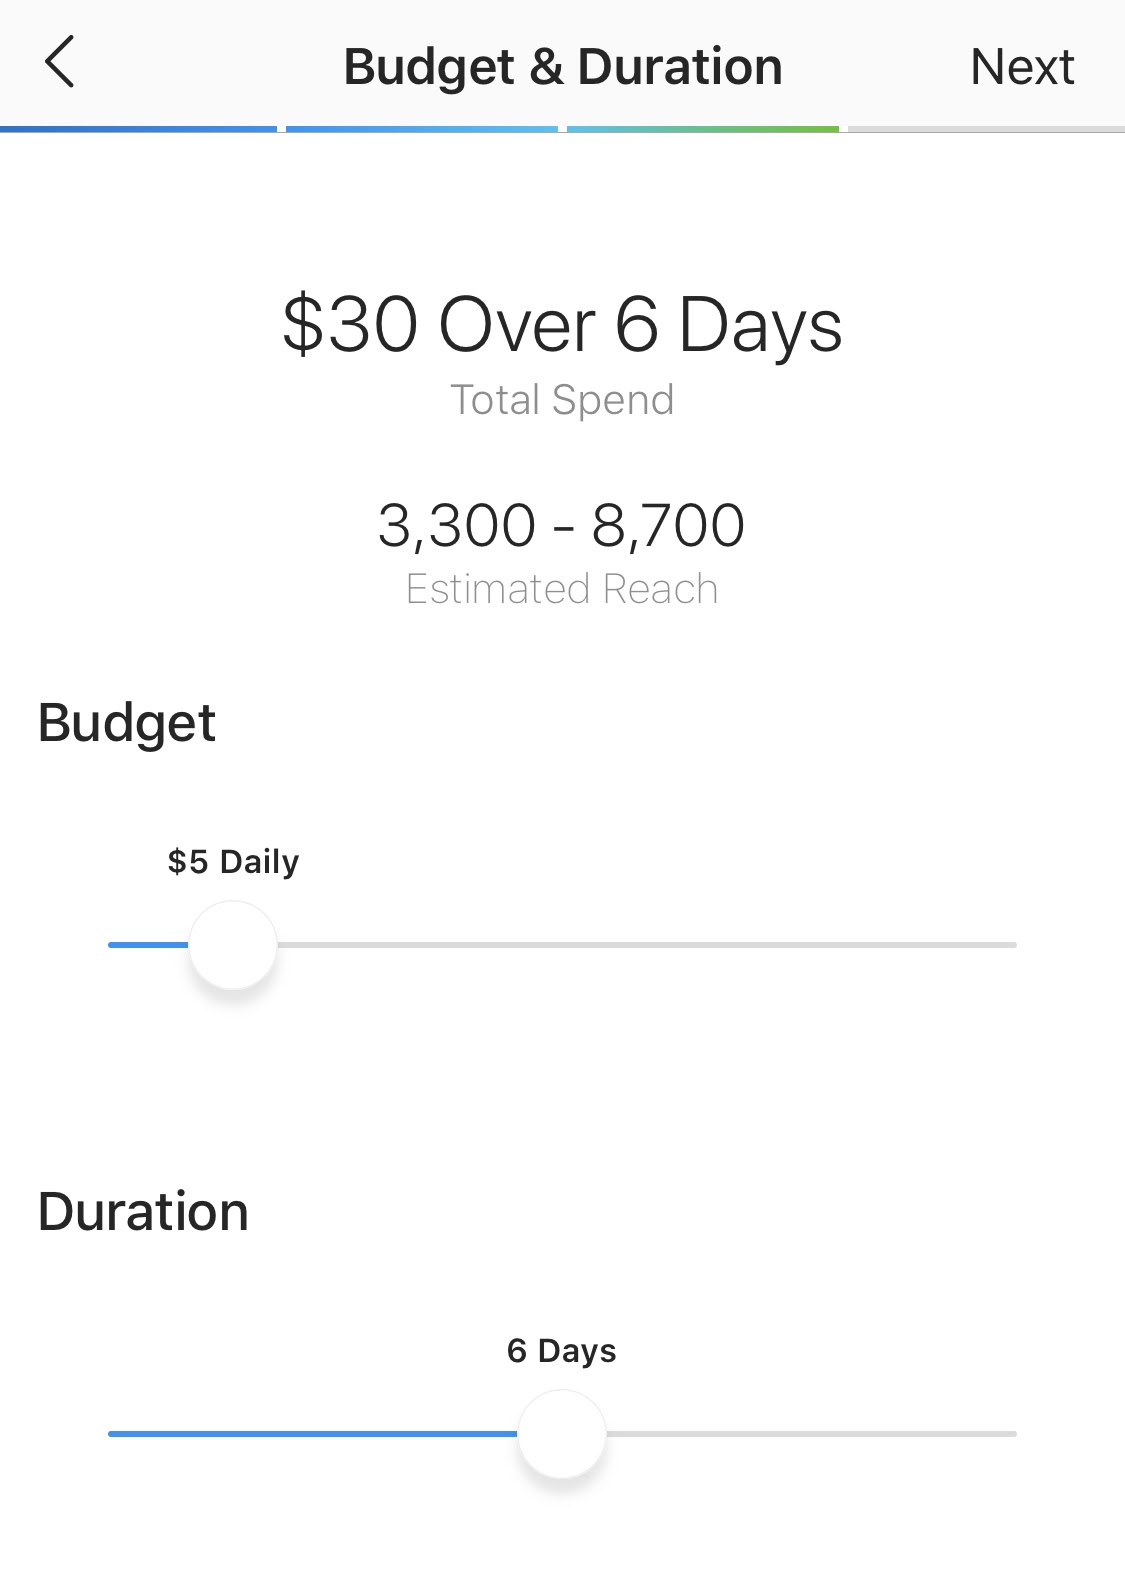
6. On the next screen, you can set your budget and the duration of your ad run time. Once your preselected budget and ad duration end, Instagram will stop promoting your post.
7. Finally, review your promotion on the next screen and hit the “Create Promotion” button.
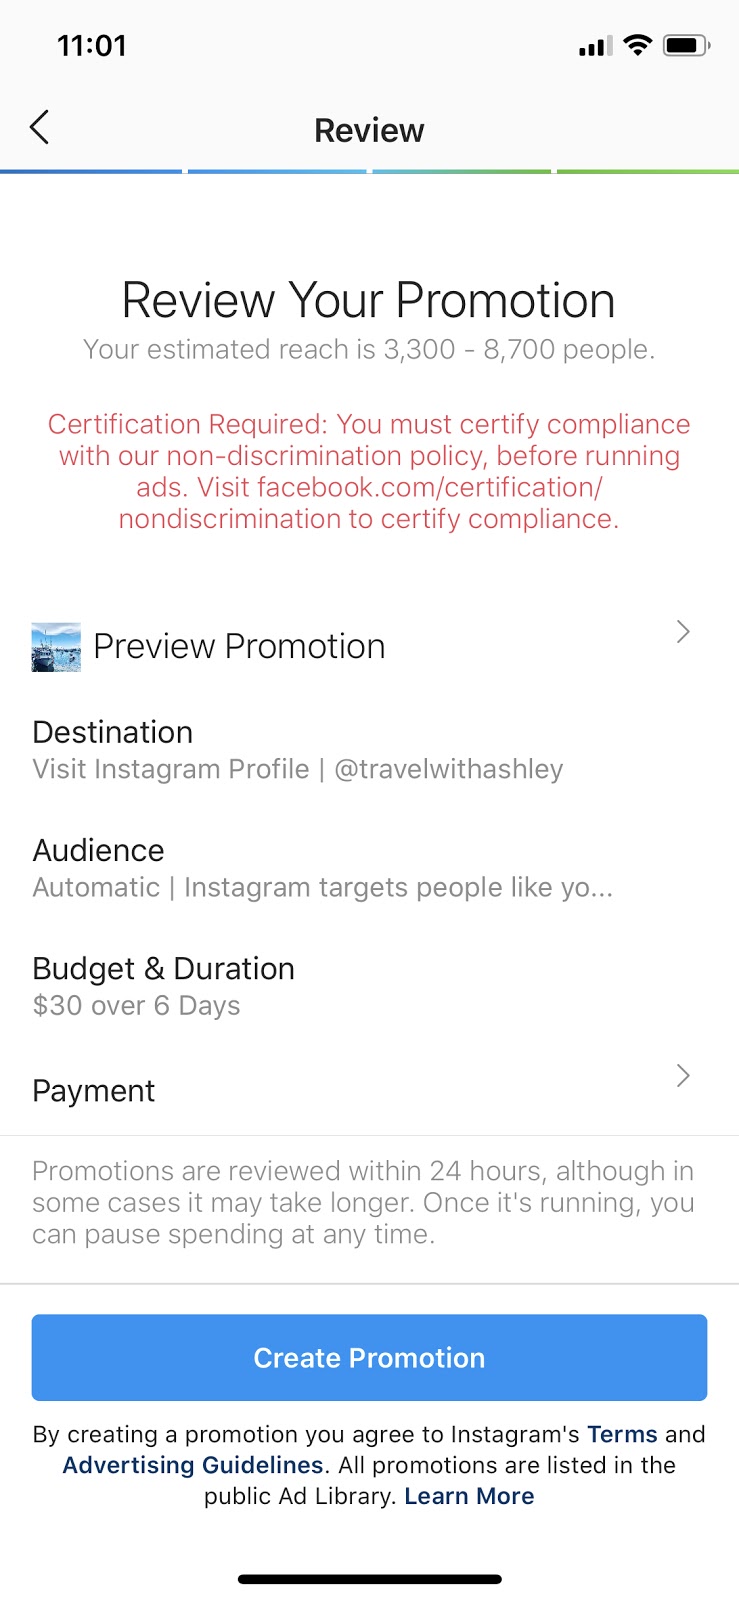
Those are the two different ways you can create a promotion on Instagram.
How to Promote a Tweet
It can be difficult to start from zero on a social media account, but here is some encouraging news about Twitter. The average Twitter user follows 5 businesses, and 80% of Twitter users have mentioned a brand in a tweet.
As such, Twitter is another productive social media platform for new website owners, and promoting a Tweet may be what you need to capture new followers.
Here’s how to promote a Tweet.
1. Log in to your Twitter account and write a Tweet.
2. Click on the down arrow icon on the bottom right side of your Tweet to see a list of menu options. These include delete, unpin from profile, embed Tweet, and view Tweet activity.
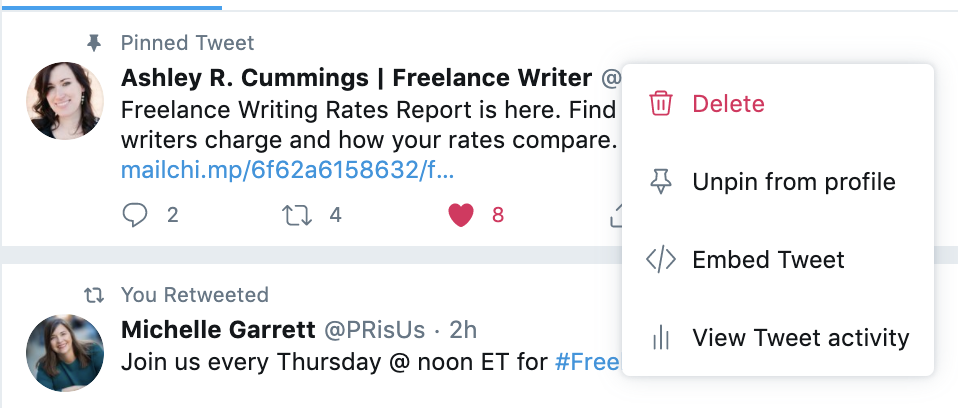
3. Click on “View Tweet activity.” Twitter will show you a screen that displays how many impressions and total engagements the respective Tweet has. It will also provide a “Get Started” button to help you promote your Tweet.
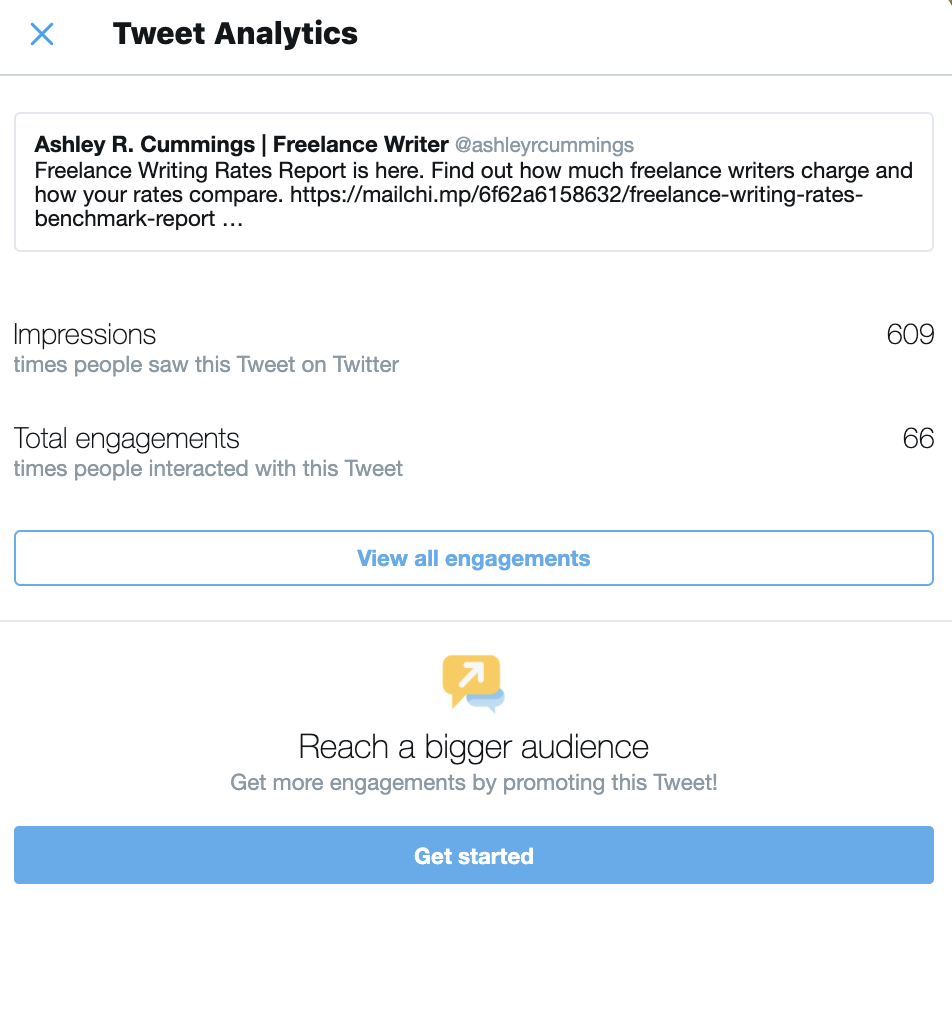
4. Click on “Get started” and then enter your payment details.
5. Once you have entered your payment details, Twitter will direct you to a screen where you can choose your audience and set your budget. Your targeting options on Twitter aren’t as detailed as they will be on Facebook and Instagram. You can only target a specific location.
6. Press “Confirm spend of X amount” and your promoted Tweet will be live.
As with Facebook and Instagram, when your budget runs out, Twitter will stop promoting your Tweet. You can also view your Twitter analytics at any time to track how your Tweet is performing.
How to Promote a Post on LinkedIn
There are several different ways to advertise on LinkedIn, including lead gen forms, message ads, text ads, and sponsored content.
For the purposes of this post, we’ll talk about how to create a sponsored content post.
Sponsored content ads come in different forms, including single image ads, video ads, and carousel ads.
There are also different ways to display your sponsored content. The type of displayed ad on LinkedIn that is most similar to a Facebook boosted post is running a native ad in the news feed.
Here are the steps to take to run a native ad in the LinkedIn news feed.
1. Create a business page for your website. It’s free to create a LinkedIn business page, and you can find more information on why this is a good idea, best practices, and instructions on this LinkedIn tutorial page.
2. Once you have a LinkedIn page for your business, you can start posting. Anything you post will show up on your LinkedIn page and in your followers’ news feeds.
3. The next step is to create a Sponsored Content campaign by:
- Signing into the Campaign Manager
- Choosing your objective (e.g., awareness, conversions, consideration)
- Building your target audience
- Setting up what your ad will look like (Here are best practices for sponsored content)
- Choosing your ad format (You would pick “sponsored content” for this type of ad)
- Setting your bid and budget
- Saving your billing address
4. Once you’ve completed the steps above, you can launch your LinkedIn campaign and start tracking your progress.
As you can see, the process for sponsoring your content on LinkedIn is a bit more involved than it is for Facebook, Instagram, and Twitter. If you have additional questions about how to get started, you can always refer to this more comprehensive guide from LinkedIn.
The Time to Start Boosting Your Social Media Posts Is Now
Advertising on social media is a great way to capture new followers, engage with your audience, and drive followers back to your website. Not to mention, boosting posts on various social platforms is one of the most affordable and immediate ways to get your content in front of new eyes.
Before you set up your social accounts and start boosting posts, however, make sure your website is up and running, well-designed, and optimized for conversions.
Checking out Virtue Media’s website builder and WordPress hosting options is the perfect place to start with building a fantastic website. To get started, visit Virtue Media today and review your hosting opportunities.


![How and When to Boost Posts on Social Media [Ultimate How and When to Boost Posts on Social Media [Ultimate Guide]](https://mdvirtue.com/wp-content/uploads/2020/11/How-and-When-to-Boost-Posts-on-Social-Media-Ultimate.jpg)

![Yes, B2B Websites Can Use Personalization Too [Here’s How]](https://mdvirtue.com/wp-content/uploads/2022/02/Yes-B2B-Websites-Can-Use-Personalization-Too-Heres-How-400x250.jpeg)

0 Comments