


SEO (search engine optimization) involves a lot of different parts. For busy business owners that know SEO is important (you’ve sure heard it enough times), it can be tempting to skip some of the smaller steps involved in on-site SEO.
But every little thing you can do to strengthen your website’s SEO makes a difference — especially if it’s something other sites may be overlooking.
Taking time to optimize your images for SEO is a simple and important step to making your website more competitive in the search engines. It’s the kind of little thing many businesses let slip through the cracks, which is precisely why doing it can give you a competitive advantage in snagging your target keywords in the SERPs (search engine results pages).
And as with many SEO best practices, most steps involved in image SEO also improve the visitor experience. So the work you put into it won’t just increase the chances people can find your site, it will also mean they like it more once they’re on it.
Why Images Are Important for SEO
So much of how we understand SEO is all about text and keywords, but images have a role to play as well. For one thing, they’re a huge part of the user experience.
Think about it: if you found yourself on a webpage that looked like a Word doc with nothing but text on a white background, you wouldn’t feel like the website was trustworthy or memorable.
Over the years, researchers have conducted studies that confirm visuals help people process information faster and remember it more effectively. That means images can make your website content more powerful and engaging.
Images are a big part of how we experience a web page. That matters for SEO because Google’s algorithm pays attention to behavioral metrics that reflect user experience, like bounce rates and the amount of time visitors spend on a web page.
And images can also be optimized to more directly boost SEO as well. Where most visitors to your page will only see the image itself, search engine crawlers see text behind the image that you can fill in to tell them what you want them to see.
12 Tips to Improve Your SEO for Images
Follow these tips to optimize the images on your website for search engines.
1. Use relevant, high-quality images.
This is crucial for the user experience side of SEO. An image that’s unrelated to the content on the page will be confusing for the user, and one that’s blurry or badly cropped will just make your page look bad and unprofessional. Make sure every image you use has a clear relationship to what’s on the page and looks good.
You have to be careful not to use any images that you don’t have the rights to, but you can find lots of resources online that provide free images businesses can use. And DIY design tools like Canva now make creating original graphics affordable, fast, and easy, even for non-designers.
Commit some time for each page you create and blog post you publish to figuring out at least one good image to include – bonus points if you can find a few.
2. Customize the filename.
This is one of those steps that’s so easy it’s amazing everyone doesn’t do it.
Before you add an image to your website, take time to customize the filename. Change it to something that’s relevant to the image and, if possible, includes one of your target keywords for the page. For example, if your web page is about a backpack product you sell, the image could be named something like brandname-backpack.jpg.
Most visitors will never see the filename, but it gives you a way to provide the search engines a little more information about what’s on the page and the best keywords to associate with it.
3. Use alt text.
This is another part of the webpage that most visitors won’t see, but search engine crawlers do. You can provide alt text for every image you add to your website that will show up in place of your image if a browser has trouble loading it or if a visitor uses a screen reader.
This text is one more part of the page that you can use to signal to search engines what the page is about. Always update the alt text for your images. Include your primary keyword for the page and something descriptive of the image itself. If you use WordPress, there’s an alt text field you can fill in to do this.
If you prefer to use HTML, you can add alt=”your alt text” to your image tag.
Alt text is useful for SEO but, just as importantly, it’s a good way to improve your website’s accessibility. So those few minutes you take to give your SEO a boost can also make your website’s experience more inclusive for visitors.
4. Add image captions.
Captions are yet another text field you have the option to include for each image on your website, but this time it’s one that your visitors can see. When it makes sense, use the caption field to add an explanation of the image or to provide further information about it to the viewer.
Image captions can potentially be one more opportunity to include your target keyword on the page, but don’t force it. Only include a caption if there’s a natural way to do so that won’t take away from the visitor’s experience.
Adding captions is a good idea in general, but there’s not one clear rule for how best to use them. In some cases, captions can be a good opportunity to add a little personality or insert a joke. If that improves the user experience more than adding in your keyword would improve your SEO, then it’s the better option. Use your best judgment here.
5. Reduce the image file size.
You do the hard work of finding or creating an image, the next step is to load it to your site, right? Not quite yet.
Often, the file size of an image is much larger than it needs to be for the size it will show up on your website. Taking a few seconds before you load it to reduce the file size can ensure it won’t slow your website down. Site speed is an SEO ranking factor, so if your visitors have to wait a while for a page on your site to load, it’s bad for the user experience and your SEO.
If you use a CMS like WordPress, resizing how an image appears on your website after you load it to the CMS is super easy – but it means that you still have the large file size that slows things down on the backend.
You can make your website faster while still displaying images at a high resolution by resizing your image files before you load them to your website. Often this is easy to do with programs that come standard on most computers, like Mac’s Preview program or Microsoft Paint. Or if you have Adobe Photoshop, you can use the “Save for Web” command to help you find the smallest file size that still provides a good resolution.
After resizing, you can still make your image file size smaller without sacrificing quality by compressing them. Check out tools like TinyPNG and JPEGmini to make this process easy.

6. Find the right quality-to-size ratio.
This part’s a little tricky, because you want your images to look really good (see: the “high quality” part of #1), but you don’t want them to be big enough to slow down your website.
So as you go through the steps above, keep an eye out to make sure your image doesn’t suddenly become blurry or start to show up so small that you can’t tell what it is.
Test out every image on your website on multiple types of devices and screen sizes to make sure it still looks OK even after you’ve reduced the size. Sometimes it’s a matter of finding the happy medium between file size and visual quality.
7. Choose the right file type.
You’ve probably noticed that there are three main types of image files, but you may not really understand the difference between each. Understanding the different file types can help you choose the best one for your needs:
- JPG is one of the most common file formats because it uses small file sizes and is widely supported. But the image quality isn’t always as good as with PNG files and the format doesn’t support transparent backgrounds, so there are some cases where JPG won’t work.
- PNG is a file format for images that provides a high resolution and can support a text description of the image that’s good for SEO. The main downside of PNG is that it tends to require larger file sizes than JPG and GIF. It’s often best for complex images and those that include text.
- GIF doesn’t support as wide of a color range as the other two, but it can be a good choice for simpler images. It supports small file sizes and transparent backgrounds.
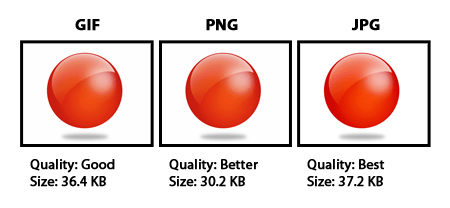
For photos, JPG often works well. For designed graphics, GIF and PNG are more common and if you need a higher quality version, the PNG is the way to go.
8. Add images to your sitemap.
Google encourages website owners to submit a sitemap to them to help them better crawl your pages and get them added to the index. They also allow you to include images in your sitemap or alternately, create a separate image sitemap to submit.
If you use WordPress, there are plugins you can use to generate an image sitemap for you, such as Google XML Sitemap for Images and Undira All Image Sitemap. If you prefer to do it yourself, Google provides information on creating an image sitemap here.
By giving Google clear information about the images on your website, you increase the likelihood of them showing up in Google Image Search, which increases your website’s overall findability.
9. Use responsive images.
By now, you’ve probably heard all about responsive websites. Going responsive is the best way to make sure your website looks good on all device types, no matter the screen size, while making sure all users see the same information. Using responsive images is part of that.
When you add an image to your website, you can make it responsive by using the HTML code srcset. This lets browsers know to select the image file size that makes the most sense for the screen size the user is on automatically and load that. It’s a super convenient tool that takes care of responsive sizing for you, so you don’t need to worry about it.
If you heard “HTML code” and basically started to tune out, don’t worry. If your website runs on WordPress, the CMS takes care of this for you. As long as you’re using WordPress 4.4 or later (which you definitely should be by now), your images will automatically have the srcset code applied without you having to do anything.
10. Use lazy loading.
Being lazy isn’t always a bad thing, and definitely not when you’re talking about lazy loading.
Lazy loading is a technique that can increase your website loading speed by having your website wait to load the images lower on the page last. Visitors won’t be stuck waiting to see any content while their browser tries to load everything on the entire page, instead they can start to see the most important page elements and trust the rest will load by the time they get there.
This tactic can be especially useful for websites that have long pages. If seeing the full page on your site requires a lot of scrolling, then why should visitors have to wait for images way down at the bottom of the page to load before they can read the text at the top?
If you use WordPress, the easiest way to implement lazy loading is with a plugin. Lazy loading is one of many features included in the JetPack plugin if you want to go that route. Or you can consider one that just provides lazy loading, like a3 Lazy Load or Lazy Load.
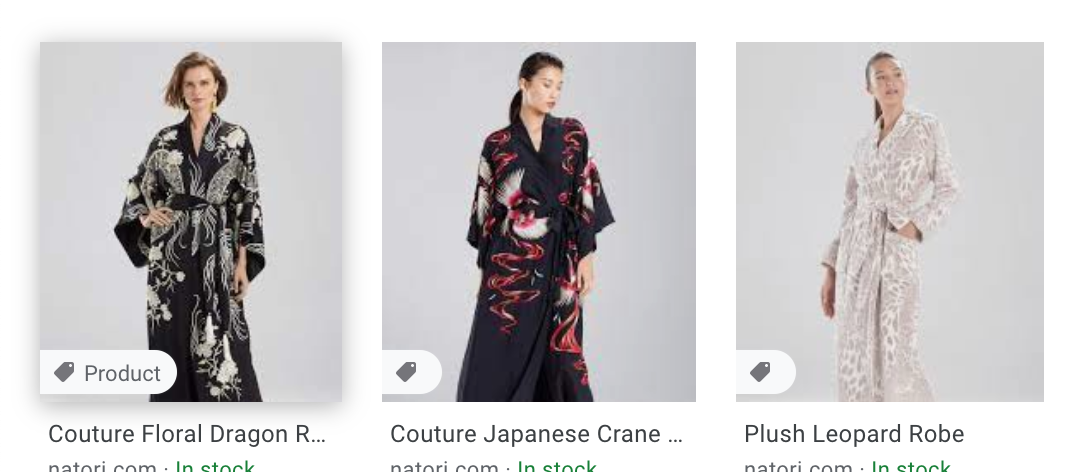
11. Use schema for products and recipes, where relevant.
Schema markup is one more tool you have for telling Google what’s on a page. For certain types of content, it provides search engines with data that helps them serve up useful information to searchers right on the SERP.
When you search for a recipe or product and see star ratings, calories, pricing, or inventory information next to the result in Google, that’s because the website uses schema markup.

Schema markup is only relevant for some types of content, but if your website includes those types of content, then it’s a smart way to further optimize your site. Using the relevant schema markup can potentially make some of your pages more noticeable in search results by including your image alongside the result. And within Image search, Google will often use schema to display a badge in the results telling users what type of content the image is for.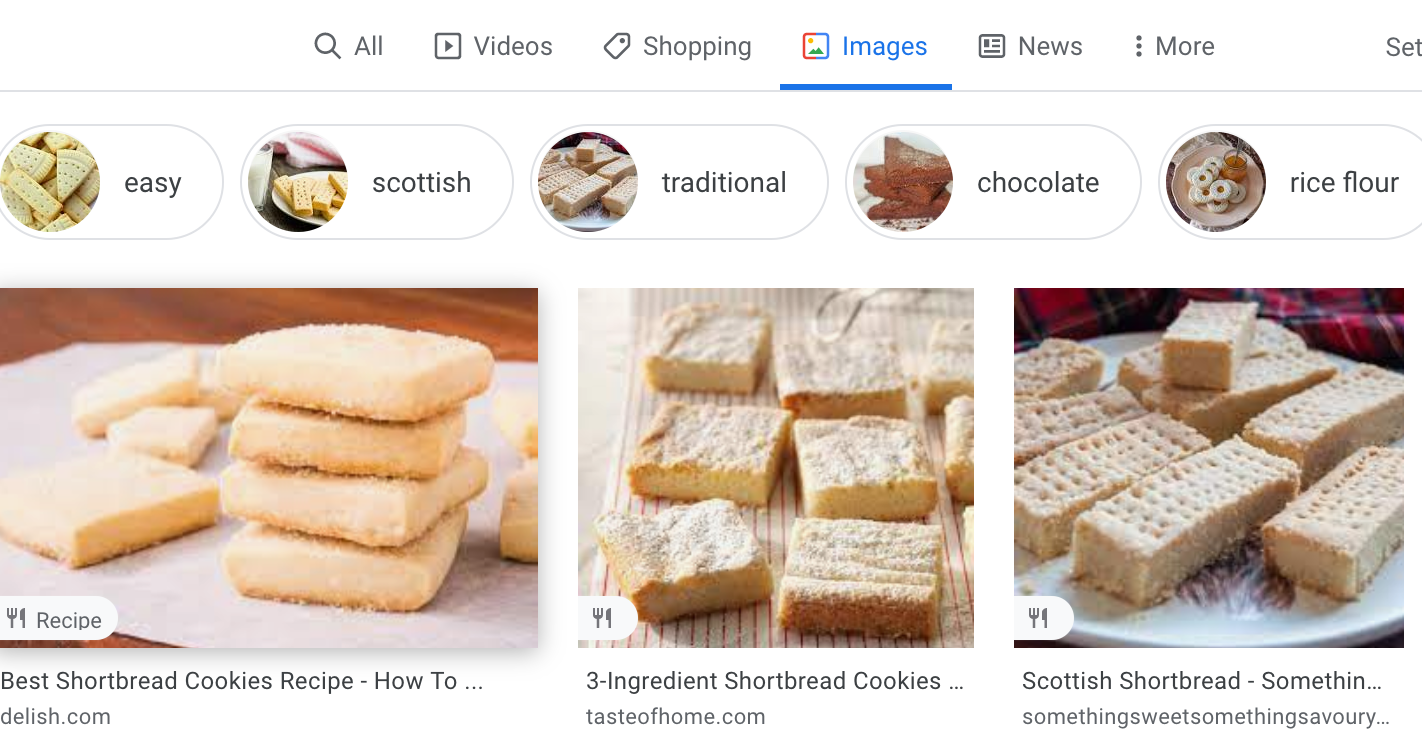
12. Host images on your own site.
While it may be tempting to host your image on a third-party website like Imgur to save space, doing so involves a real risk. Anytime those sites are overloaded with traffic, your images could fail to load, creating a confusing experience on your website and making your brand look bad.
You’ll be better served by hosting the images on your own website and using the advice provided above to make your image file size smaller so they don’t slow down your web pages any more than necessary. And when you go with a reliable hosting provider, you’ll always know your images (and the rest of your website) will show up as they should for your visitors.
Make the Time for Image SEO
Image SEO is relatively easy, as far as SEO goes. By committing a little extra time to find the right images and optimize them for search every time you add a page to your website, you can give your pages an extra edge in the search engines.


![Yes, B2B Websites Can Use Personalization Too [Here’s How]](https://mdvirtue.com/wp-content/uploads/2022/02/Yes-B2B-Websites-Can-Use-Personalization-Too-Heres-How-400x250.jpeg)

0 Comments